添加任务 添加任务的功能实现和前面实现用户功能的流程完全一致:
根据需求完善模型
创建需要的表单
编写控制器代码
完善 task 模型 打开 app/model/task.php(如果没有则用 WebSetup 创建),修改下面几个地方:
属性和关联的定义:
1
2
3
4
5
6
7
8
'props' => array
(
.....
'is_completed' => array ('readonly' => true ),
'completed_at' => array ('readonly' => true ),
'owner' => array (QDB::BELONGS_TO => 'User' , 'source_key' => 'owner_id' ),
),
验证规则:
1
2
3
4
5
6
7
8
'validations' => array
(
'subject' => array
(
array ('not_empty' , '任务主题不能为空' ),
array ('max_length' , 180 , '任务主题不能超过 60 个汉字或 180 个字符' ),
),
),
自动填充规则:
1
2
3
4
5
6
7
8
9
'create_autofill' => array
(
.....
'is_completed' => false ,
'completed_at' => null ,
),
create_autofill 设置可以在创建对象时将指定的数值设置为特定值。例如“新建任务的状态是未完成”这个逻辑就可以通过简单的指定 create_autofill 来实现。
1
'attr_accessible' => 'subject, description' ,
attr_accessible 设置会在构造对象时产生作用:
1
2
$task = new Task($form->values());
$task->save();
上述代码构造了一个新的 task 模型实例,并且以表单的值作为对象初始值。这种方式很方便,但存在一个安全隐患。
假设用户在客户端构造一个包含“task_id”字段值的表单,并提交到服务器,那么此时构造出来的 $task 对象就包含了 task_id 属性值。由于 task_id 属性也是 task 对象存储在 tasks 表中的主键字段,那么在接下来调用 save() 方法时,实际完成的操作不是“新建一个 task 对象”,而是“更新一个已有的 task 对象”。因此我们务必要堵上这样的漏洞。
设置 attr_accessible 选项,可以指定哪些属性可以通过构造函数来赋值 ,这样上面的代码中即便表单包含 task_id 值,也不会被存入新建的对象,实现了安全性。
创建表单 添加 app/form/task.php 内容是:
1
2
3
4
5
6
7
8
9
10
11
12
13
14
15
class Form_Task extends QForm
{
function __construct ()
{
parent ::__construct('form_task' );
$fields = array ('subject' => array (),'description' => array (), 'is_completed' => array ());
$this ->loadFromConfig($fields);
$this ->addValidations(Task::meta());
}
}
添加控制器动作 修改 tasks 控制器(如果没有则通过 WebSetup 创建),添加 actionCreate() 动作方法:
1
2
3
4
5
6
7
8
9
10
11
12
13
14
15
16
17
18
19
function actionCreate ()
{
$form = new Form_Task();
if ($this ->_context->isPOST() && $form->validate($_POST))
{
$user = $this ->_app->currentUserObject();
$task = $user->createTask($form['subject' ]->value, $form['description' ]->value);
$task->save();
return $this ->_redirect(url('tasks/index' ));
}
$this ->_view['form' ] = $form;
}
以及对应的视图 app/view/tasks/create.php:
1
2
3
4
5
6
7
8
9
10
11
12
13
14
15
16
17
18
19
20
21
22
23
24
25
26
27
28
<?php $this ->_extends('_layouts/default_layout' ); ?>
<?php $this ->_block('contents' ); ?>
<form action ="<?php echo url('tasks/create'); ?>" method ="post" >
<h1 > 添加任务</h1 >
<fieldset >
<p >
<label for ="username" > 任务主题</label >
<input type ="text" name ="subject" id ="subject" />
<span class ="error" > <?php echo $form['subject' ]->isValid() ? "" : $form['subject' ]->errorMsg()[0 ];?> </span >
</p >
<p >
<label for ="password" > 任务描述</label >
<textarea name ="description" id ="description" rows ="5" > </textarea >
<span class ="error" > <?php echo $form['description' ]->isValid() ? "" : $form['description' ]->errorMsg()[0 ];?> </span >
</p >
<p >
<label > </label >
<input type ="submit" name ="Submit" value ="添加" />
</p >
</fieldset >
</form >
<?php $this ->_endblock(); ?>
这里我们用到了应用程序对象的一个新方法 currentUserObject()。但这个方法还需要添加到 app/myapp.php 中,代码如下:
1
2
3
4
5
6
7
8
9
10
11
12
13
14
15
16
17
18
19
20
21
22
23
24
25
26
27
28
29
* 获得当前用户对应的 User 模型对象实例
*
* @return User
*/
function currentUserObject ()
{
$key = 'currentUserObj' ;
try {
$user = Q::registry($key);
return $user;
}catch (QException $e){
}
$data = $this ->currentUser();
$user = User::find('user_id = ?' , $data['id' ])->query();
if ($user->id())
{
Q::register($user, $key);
return $user;
}
else
{
throw new MyAppException('当前访问用户没有对应的 User 对象' );
}
}
currentUserObject() 方法不但通过查询操作获得 User 模型对象实例,而且通过检查其 ID 来确保这个对象是肯定存在的。这种做法从根本上保证了后续数据的有效性。为了避免每次获取都去查询数据库,通过 Q::register($user, $key)写入内存缓存,查询数据库前先通过Q::registry($key)取出缓存。
保证逻辑的正确性和数据的有效性是应用程序的核心使命!
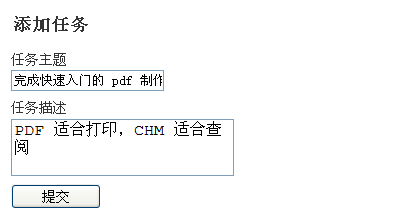
测试创建任务 通过浏览器访问 http://localhost/todo/public/index.php?controller=tasks&action=create 就可以看到添加任务表单:
输入有效数据后提交,可以通过 phpMyAdmin 看到数据已经成功添加:
添加任务查看页面 修改 tasks 控制器的 actionIndex() 动作方法:
1
2
3
4
5
function actionIndex ()
{
$tasks = Task::find('owner_id = ?' , $this ->_app->currentUserObject()->id())->getAll();
$this ->_view['tasks' ] = $tasks;
}
以及对应的视图 app/view/tasks/index.php:
1
2
3
4
5
6
7
8
9
10
11
12
13
14
15
16
17
18
19
20
21
22
23
24
25
26
27
28
29
30
31
32
33
<?php $this->_extends('_layouts/default_layout'); ?>
<?php $this->_block('contents'); ?>
<div class="tasks">
<h1>我的任务</h1>
<?php foreach ($tasks as $task): ?>
<h2><a href="<?php echo url('tasks/edit', array('task_id' => $task->id())); ?>"><?php echo h($task->subject); ?></a></h2>
<p class="meta">
<?php if ($task->is_completed): ?>
<em>已经在 <?php echo date('m-d H:i', $task->completed_at); ?> 完成该任务</em>
<?php else: ?>
<strong>添加日期:<?php echo date('m-d H:i', $task->created); ?></strong>
<?php endif; ?>
</p>
<?php if ($task->description): ?>
<p class="description">
<?php echo nl2br(h($task->description)); ?>
</p>
<?php endif; ?>
<hr />
<?php endforeach; ?>
</div>
<?php $this->_endblock(); ?>
最后在 app/public/css/style.css 添加一些样式定义,以便让列表页面看上去更美观:
1
2
3
4
5
6
7
8
9
10
11
12
13
14
15
16
.tasks h2 {
font-size : 18px ;
font-weight : bold;
}
.tasks p {
font-size : 14px ;
color : #333 ;
font-weight : normal;
}
.tasks p .meta {
font-size : 12px ;
font-weight : normal;
color : #666 ;
}
现在添加任务后就可以看到任务列表了:
现在我们在顶部加上一个连接,跳转到添加任务的页面
1
<a href ="<?php echo url('tasks/create') ?>" > 添加任务</a >